1. Allied Command Phase. In this phase the Allied player (me) determines the supply status of all Headquarters (HQ) units, attempts to remove disruption, places airstrikes and performs construction activities.
 |
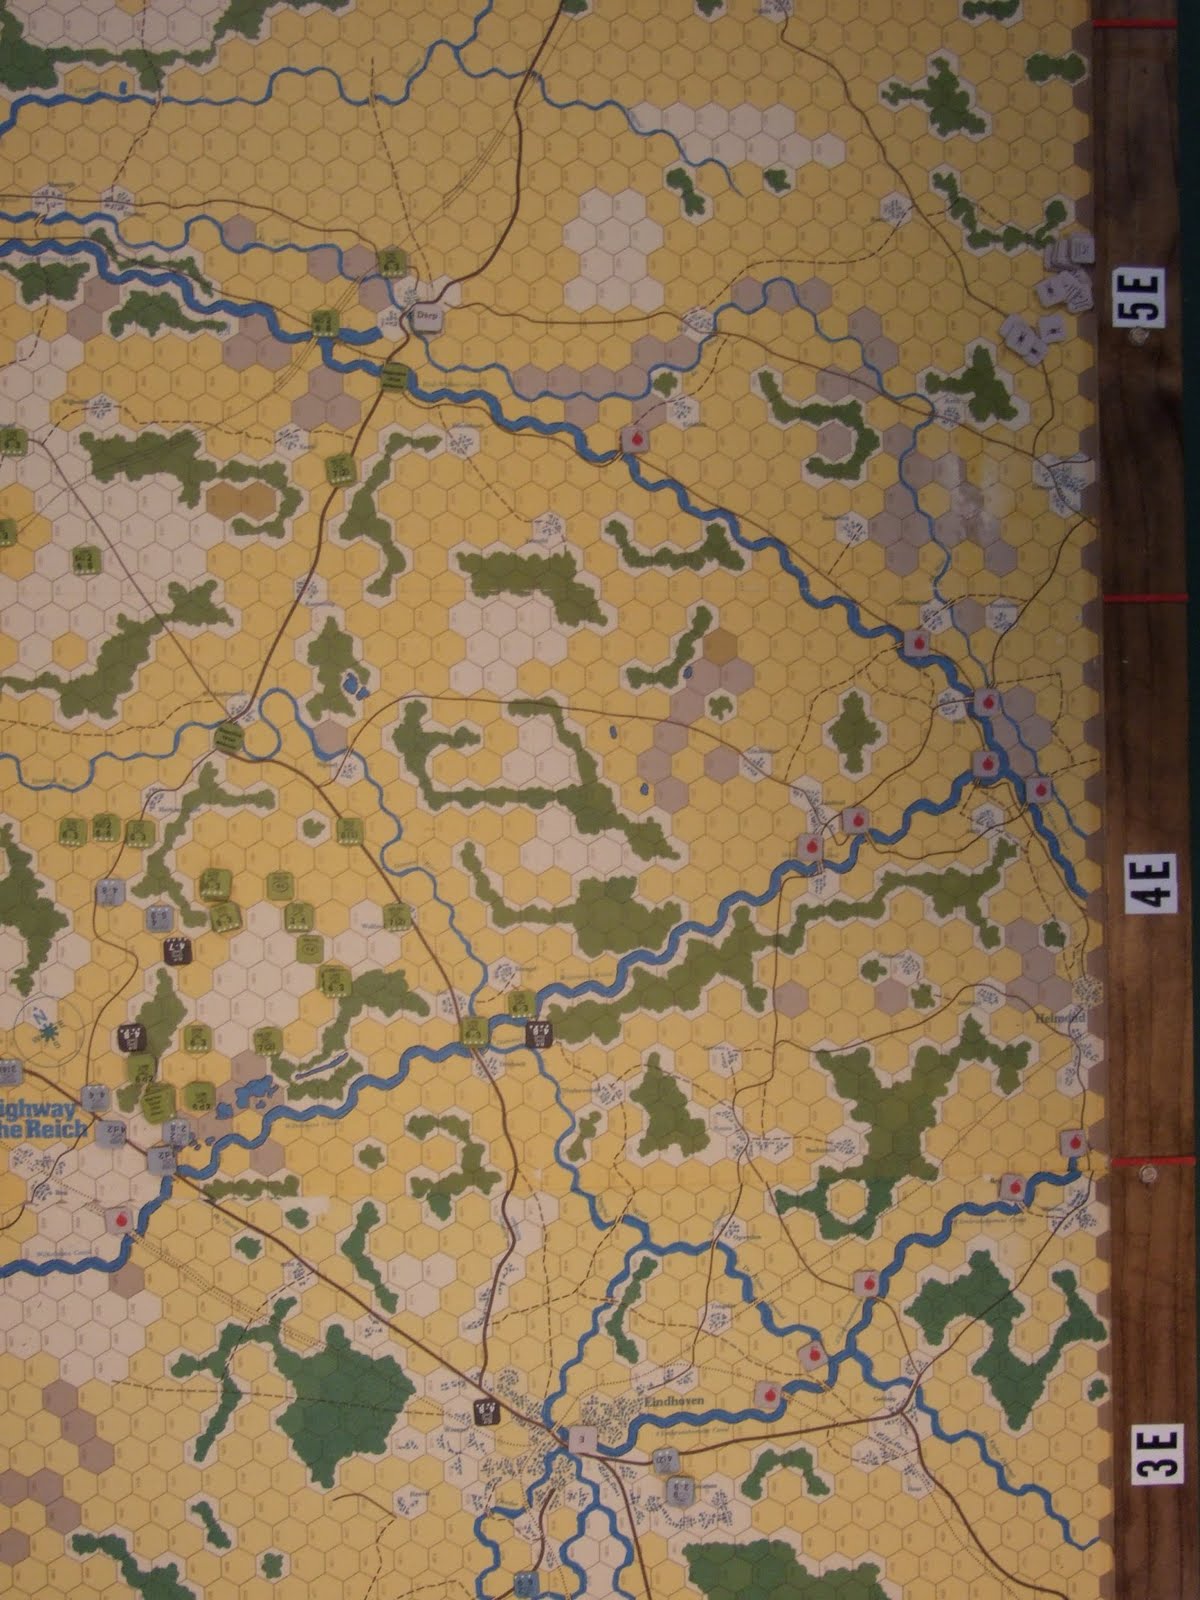
| Turn 5 - Start and Welsh Guards HQ supply determination |
The picture above shows the relative positions of the forces. The Welsh Guards regiment is subordinate to the Guards Armored (GA) divisional HQ. So it has to trace supply to that HQ or the Allies ultimate supply source, which is the south edge of Map D. A subordinate HQ such as this has 8 Movement Points (MPs) to get to a supply source. Using Travel Mode on a Trail costs 1/4 of a MP and on a Road costs 1/8th of a MP. Using the road indicated, it is apparent that the Welsh Guards HQ is indeed in supply.
I had some Airstrikes to burn. They are pretty useless with the rules as written. But in this case I can use them to fix the Germans in place (so they don't run away). This is because if Steve puts the targeted units into Travel Mode in the next Phase, they will probably suffer a hit and become disrupted.
There aren't any Disrupted Allied units involved in this little battle, and there is no Construction (like bridge repair) either. So this concludes the Allied Command Phase.
2. German Mode Phase. In this Phase the German Player can make voluntary mode changes to all of his units. In this instance, Steve did not make any changes.
I had some Airstrikes to burn. They are pretty useless with the rules as written. But in this case I can use them to fix the Germans in place (so they don't run away). This is because if Steve puts the targeted units into Travel Mode in the next Phase, they will probably suffer a hit and become disrupted.
There aren't any Disrupted Allied units involved in this little battle, and there is no Construction (like bridge repair) either. So this concludes the Allied Command Phase.
 |
| Turn 5 - at the conclusion of the German Mode Phase |
3. Allied Conditional Fire Phase. What makes it "conditional" is that units which fire in this Phase may not move in the next Phase.
I want to move my armor, so the only fire I choose to execute is with the artillery, as shown above. Two of the artillery units attack the German Para unit on the right. That attack is within their range of "2" and the attacks have a Combat Effectiveness of "8". That is devastating for units in Concentrated Mode and the German unit suffers a Strength Point loss of 4, and is dispersed. The third artillery unit in the stack doubles its Range and halves its Effectiveness to attack the other German para unit with a Combat Effectiveness of "5". That attack results in a loss of one Strength Point and the unit is dispersed. That concludes this Phase.
4. Allied Conditional Movement Phase. Now the Allies can move any unit that didn't fire in the previous phase, which in this case is everything but the three artillery units. Each unit can be moved up to the limit of its movement allowance of 4, but it has to be executed in one movement. It is not allowed to move a unit a portion of its movement allowance, move another unit, and then come back to the first unit and use the remainder of its movement. So it is important to sequence movement in a way that maximizes your capabilities. This is especially important when executing Close Assaults.
The first order of business is to move one of the Anti-Tank units (in the lower right) belonging to the Guards Armored division forward one hex and drop it out of Travel Mode. Now it can observe for the GA divisional artillery, which is off the picture to the southwest.
Now for the first Close Assault. One of the Tank units in the 2nd row of the advancing column moves forward as indicated in the picture above, attacking the German Para unit on the right. This unit suffered four Strength Point losses from the artillery attacks in the prior phase, so it has a current Strength of "2". It is so weakened that it is no longer effective against armor, so there is no Opportunity Fire. The attack is resolved at 2-1 odds with an Close Action Value of "8" and the German unit is eliminated. The attacking Tank unit occupies the hex held by the German unit. That opens things up a little on the right side, so a second British Tank unit from the stack moves forward and occupies the Woods hex adjacent to the German artillery.
Next, the dispersed and damaged Tank units in the lead on the left move left one hex to get out of the way of the units behind them. I don't want to use them in the attack because they are not at full strength. They are in a Town hex which has a Stacking Limit of 12, so an attacking stack can't move through them.
Now it's time for the second Close Assault. The three Tank units in the 2nd row of the advancing column on the left move forward in a stack as indicated in the picture above, attacking the German Para unit on the left. This unit suffered one Strength Point loss from the artillery attack in the prior phase, so it has a current Strength of "5" and is dispersed. It is able to Opportunity Fire with a Combat Effectiveness of "2", but there is no result. The attack is resolved at 2-1 odds with an Close Action Value of "7" and the German unit is Disrupted and must retreat one hex. The attacking Tank units occupy the hex held by the German unit.
Finally, the remaining units advance as far as they can. I noticed that the Welsh Guards HQ was within the German Artillery unit's Range of 5. Headquarters units are extremely vulnerable to fire combat because they are not permitted to disperse. They take extra damage instead. So I retreated this HQ one hex to lessen the risk.
The airstrikes placed during the Allied Command Phase are now resolved, and the German Headquarters unit is disrupted. That means that it can't move or provide supply to the units that belong to it.
5. German Conditional Fire Phase. Because all of the German units are now out of supply, Steve chose not to fire and risk Depletion.
6. German Conditional Movement Phase. Only the German Heavy Weapons company was able to move and Steve chose not to move it.
7. Allied Free Fire Phase. Because I have a spotter now (the Anti-Tank unit in the Woods with the designation "GAxx"), I can call in the Guards Armored divisional artillery (not visible in the picture above). The German Artillery and Heavy Weapons units are just within range. I have six attacks with a Combat Effectiveness of "9". The result is that both German units are eliminated. The only other attacks available now are the Tanks in the lead on the left attack into the Disrupted German Para unit with a Combat Effectiveness of "7". None of those attacks do any damage.
8. German Command Phase. This is just like the Allied Command Phase (Step1), except that it is the German Player performing the actions. Steve successfully removed the disruption from his Headquarters, but not the Para unit. Now his units are in supply again.
9. Allied Mode Phase. In this Phase the Allied Player can make voluntary mode changes to all of his units (similar to Step 2 for the Germans). I concentrated the dispersed Tank unit and that was it.
10. German Conditional Fire Phase. There are no opportunities for German fire.
11. German Conditional Movement Phase. Only the German Headquarters was able to move and Steve chose not to move it.
12. Allied Conditional Fire Phase. The remaining German units are out of range of the divisional artillery, and I chose not to fire with any of the units from the Welsh Guards.
13. Allied Conditional Movement Phase. So here is the payoff.
Disrupted units have no Strength, no Effectiveness and their Morale is current Morale - 3. So essentially, any unit can Close Assault a disrupted unit with 100% chance of success. The top unit (only) of the lead stack on the left Close Assaulted the disrupted German Para unit and eliminated it. Then 3 Tank units from the middle stack moved up the railroad (dotted line) and Close Assaulted the German HQ as shown in the picture above. The HQ's Opportunity Fire had no result and the Close Assault resulted in a disruption and retreat. The German HQ retreated as shown by the blue arrow. The last attack was carried out by the Tank unit on the right that started in the Woods hex and was automatically successful (shown in green). Now all of the German units have been eliminated.
Finally, all of the remaining Allied units moved to the railroad and moved north along it to the limit of their Movement Allowances. The lead unit of the Welsh Guards ended the Turn two hexes from the center of Valkenswaard.
14. German Free Fire Phase. There are no German units.
15. Bookkeeping. Performed at the end of each Turn. Victory Points are calculated.
CONCLUSION
This battle demonstrated all of the important game mechanics. In addition, it showed how devastating the combination of massed artillery and tanks can be against infantry - especially in open terrain.
 |
| Turn 5 - Allied 1st Conditional Fire Phase |
4. Allied Conditional Movement Phase. Now the Allies can move any unit that didn't fire in the previous phase, which in this case is everything but the three artillery units. Each unit can be moved up to the limit of its movement allowance of 4, but it has to be executed in one movement. It is not allowed to move a unit a portion of its movement allowance, move another unit, and then come back to the first unit and use the remainder of its movement. So it is important to sequence movement in a way that maximizes your capabilities. This is especially important when executing Close Assaults.
 |
| Turn 5 - 1st Allied Conditional Movement Phase |
Now for the first Close Assault. One of the Tank units in the 2nd row of the advancing column moves forward as indicated in the picture above, attacking the German Para unit on the right. This unit suffered four Strength Point losses from the artillery attacks in the prior phase, so it has a current Strength of "2". It is so weakened that it is no longer effective against armor, so there is no Opportunity Fire. The attack is resolved at 2-1 odds with an Close Action Value of "8" and the German unit is eliminated. The attacking Tank unit occupies the hex held by the German unit. That opens things up a little on the right side, so a second British Tank unit from the stack moves forward and occupies the Woods hex adjacent to the German artillery.
Next, the dispersed and damaged Tank units in the lead on the left move left one hex to get out of the way of the units behind them. I don't want to use them in the attack because they are not at full strength. They are in a Town hex which has a Stacking Limit of 12, so an attacking stack can't move through them.
Now it's time for the second Close Assault. The three Tank units in the 2nd row of the advancing column on the left move forward in a stack as indicated in the picture above, attacking the German Para unit on the left. This unit suffered one Strength Point loss from the artillery attack in the prior phase, so it has a current Strength of "5" and is dispersed. It is able to Opportunity Fire with a Combat Effectiveness of "2", but there is no result. The attack is resolved at 2-1 odds with an Close Action Value of "7" and the German unit is Disrupted and must retreat one hex. The attacking Tank units occupy the hex held by the German unit.
Finally, the remaining units advance as far as they can. I noticed that the Welsh Guards HQ was within the German Artillery unit's Range of 5. Headquarters units are extremely vulnerable to fire combat because they are not permitted to disperse. They take extra damage instead. So I retreated this HQ one hex to lessen the risk.
The airstrikes placed during the Allied Command Phase are now resolved, and the German Headquarters unit is disrupted. That means that it can't move or provide supply to the units that belong to it.
5. German Conditional Fire Phase. Because all of the German units are now out of supply, Steve chose not to fire and risk Depletion.
6. German Conditional Movement Phase. Only the German Heavy Weapons company was able to move and Steve chose not to move it.
 |
| Turn 5 - at the conclusion of the 1st German Conditional Movement Phase |
7. Allied Free Fire Phase. Because I have a spotter now (the Anti-Tank unit in the Woods with the designation "GAxx"), I can call in the Guards Armored divisional artillery (not visible in the picture above). The German Artillery and Heavy Weapons units are just within range. I have six attacks with a Combat Effectiveness of "9". The result is that both German units are eliminated. The only other attacks available now are the Tanks in the lead on the left attack into the Disrupted German Para unit with a Combat Effectiveness of "7". None of those attacks do any damage.
8. German Command Phase. This is just like the Allied Command Phase (Step1), except that it is the German Player performing the actions. Steve successfully removed the disruption from his Headquarters, but not the Para unit. Now his units are in supply again.
9. Allied Mode Phase. In this Phase the Allied Player can make voluntary mode changes to all of his units (similar to Step 2 for the Germans). I concentrated the dispersed Tank unit and that was it.
10. German Conditional Fire Phase. There are no opportunities for German fire.
11. German Conditional Movement Phase. Only the German Headquarters was able to move and Steve chose not to move it.
 |
| Turn 5 - at the end of the 2nd German Conditional Movement Phase |
13. Allied Conditional Movement Phase. So here is the payoff.
 |
| Turn 5 - 2nd Allied Conditional Movement Phase |
Disrupted units have no Strength, no Effectiveness and their Morale is current Morale - 3. So essentially, any unit can Close Assault a disrupted unit with 100% chance of success. The top unit (only) of the lead stack on the left Close Assaulted the disrupted German Para unit and eliminated it. Then 3 Tank units from the middle stack moved up the railroad (dotted line) and Close Assaulted the German HQ as shown in the picture above. The HQ's Opportunity Fire had no result and the Close Assault resulted in a disruption and retreat. The German HQ retreated as shown by the blue arrow. The last attack was carried out by the Tank unit on the right that started in the Woods hex and was automatically successful (shown in green). Now all of the German units have been eliminated.
Finally, all of the remaining Allied units moved to the railroad and moved north along it to the limit of their Movement Allowances. The lead unit of the Welsh Guards ended the Turn two hexes from the center of Valkenswaard.
 |
| Turn 5 - at the conclusion of the 2nd Allied Conditional Movement Phase |
14. German Free Fire Phase. There are no German units.
15. Bookkeeping. Performed at the end of each Turn. Victory Points are calculated.
CONCLUSION
This battle demonstrated all of the important game mechanics. In addition, it showed how devastating the combination of massed artillery and tanks can be against infantry - especially in open terrain.